
|
|
|
|
I have written before about ways to use an Excel® spreadsheet to speed data entry when working with AutoCAD. (See "Making A Silk Purse From The Proverbial Sow's Ear," Spring, 1997.) In those cases, data from survey work were already in a file, and the intent was to enter the data into AutoCAD in as painless a way as possible. While in Athens in February, I had occasion to use Excel again, but this time in a different way that may be useful to others. I was working on the Propylaea model, and the data available were in a rather unusual form.
The architect in charge of the structure, Dr. Tasos Tanoulas, produced a set of drawings to specify exact, three-dimensional point locations of the corners of blocks on a wall of the structure. To do that, Mr. Tanoulas first had to carry out the survey work, and he did that in a very careful way, using standard tapes. Three planes were created to represent the three axes of an x-, y-, and z- grid, and measurements could be taken separately for each coordinate of each point. That is, measurements from the x-axis could be taken and recorded for the corners of all the blocks; then y-axis dimensions could be taken, and then z-axis dimensions. That kind of survey care is important, because the walls of the building are no longer simple vertical planes and cannot be accurately located with only two dimensional measurement schemes. Traditional ways of recording the wall would have obscured the changes in position relative to the intended plane of the wall.
Having surveyed the wall with such care, Mr. Tanoulas and his staff had to find a way to pass the information on to others. A scaled drawing - limited to two dimensions - would necessarily omit any indication of depth. In addition, a scaled drawing could not preserve the precision of the original measurements. Therefore, Mr. Tanoulas decided to produce three drawings for each wall that had been so carefully examined. Each would be identical as to scale and subject matter. However, each would have one set of numbers and show just one coordinate for each point measured - the x-coordinates all on one drawing; the y-coordinates all on another, and the z-coordinates on a third. This is a superb data source, preserving the full three-dimensional nature of the data and the original precision, but it is very difficult to use to build a CAD model of any given wall.
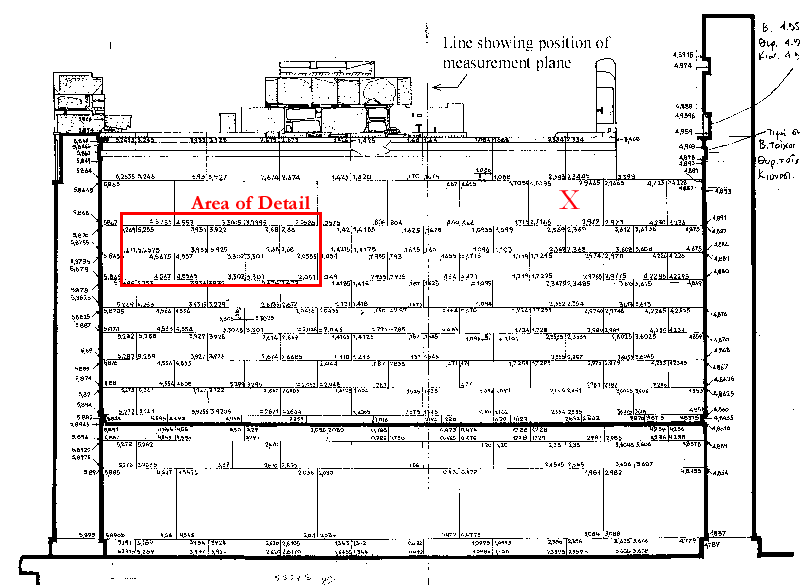
Fig. 1 - One of Mr. Tanoulas' drawings of the north wall of the northwest wing of the Propylaea (Study for the Restoration
of the Propylaea, Vol. 1, T. Tanoulas, M. Ioannidou, and A. Moraitou, Athens, 1994, Fig. 45), with numbers
in each corner of each block representing the x-axis position of the corner. Note that the plane from which
measurements were taken is indicated, and numbers to the left would be interpreted as negative numbers in a
Cartesian grid system.The block marked with an X is also marked with an X in the AutoCAD drawing
below to help readers orient that drawing.
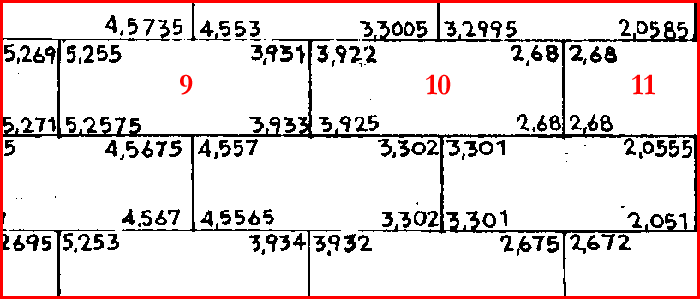
Fig. 2 - Detailed area of Fig. 1. Blocks 9, 10, and 11 are shown in the Excel spreadsheet (below). As in fig. 1, only x-coordinates are given.
I decided it would be easier to use a spreadsheet than to try to enter the data from the drawings in a CAD system directly to model individual blocks one at a time. That worked very well. I prepared an Excel spreadsheet with cells for x-, y-, and z-coordinates for each block and with formulae in other cells that combined those coordinates into AutoCAD commands. I could enter all the coordinates from one drawing, all the coordinates from a second drawing, and then all the coordinates form the third. The formulae in the other cells (which only needed to be prepared once) automatically generated the AutoCAD commands. I prepared formula in the cells with AutoCAD commands so that the cells would remain empty if the entire face of the block could not be drawn because of a missing coordinate. I also prepared the commands so that the block faces would be drawn in the correct fashion. ("Drawn in the correct fashion" means drawn so that the system can determine which side of a given surface is considered the "front" or "outside." This is easy to overlook when making a CAD model and, indeed, of relatively little importance in a CAD setting; however, it can have a significant impact on speed when rendering and may affect the utility of a model if it is exported to a rendering program or a virtual reality system.)
| block no. | position | x-coordinate | y-coordinate | z-coordinate | OK | command |
| 9 | UL | -5.255 | 0.363 | 3.289 | 1 | 3DFACE -5.255,0.363,3.289 |
| UR | -3.931 | 0.3525 | 3.2895 | 1 | -5.2575,0.3695,2.798 | |
| LR | -3.933 | 0.358 | 2.8 | 1 | -3.933,0.358,2.8 | |
| LL | -5.2575 | 0.3695 | 2.798 | 1 | -3.931,0.3525,3.2895 | |
| 10 | UL | -3.922 | 0.349 | 3.2895 | 1 | 3DFACE -3.922,0.349,3.2895 |
| UR | -2.68 | 0.345 | 3.286 | 1 | -3.925,0.356,2.8 | |
| LR | -2.68 | 0.352 | 2.798 | 1 | -2.68,0.352,2.798 | |
| LL | -3.925 | 0.356 | 2.8 | 1 | -2.68,0.345,3.286 | |
| 11 | UL | -2.68 | 0.345 | 3.286 | 1 | 3DFACE -2.68,0.345,3.286 |
| UR | -1.42 | 0.343 | 3.286 | 1 | -2.68,0.352,2.798 | |
| LR | -1.4215 | 0.349 | 2.7985 | 1 | -1.4215,0.349,2.7985 | |
| LL | -2.68 | 0.352 | 2.798 | 1 | -1.42,0.343,3.286 |
The table shows a portion of the spreadsheet with numbers entered and the AutoCAD commands in the last column. The first column simply indicates the number of the block in my sequence; the second column indicates which corner of the block is specified. Following the last coordinate is a column labeled OK; the content of cells in that column is also determined by a formula. A 1 in that column indicates that all three coordinates for the particular corner have been specified; a zero indicates that at least one is missing. If there are any zeros for a particular block, no command is generated. (Note that the coordinates in the AutoCAD commands column do not appear in the same order as the coordinates in the other columns. It seemed natural to record the coordinates of the vertices of the blocks in a clockwise sequence, but AutoCAD expects the front of a surface to have the coordinates of the vertices entered counter-clockwise. Therefore, the commands are arranged to put the coordinates in counter-clockwise order.)
When all the coordinates had been entered, all the AutoCAD commands had been automatically entered as well. I had intended to paste them into a text file, save it as an AutoCAD script, and then call the script within AutoCAD. That would work, but it turned out that I could simply copy the column containing the AutoCAD commands and paste that column into the AutoCAD command line using the control-C and control-V keystroke commands. All the blocks were drawn in an instant.
The first portion of the command text from the part of the spreadsheet shown in the table follows. (Spaces have been added for legibility a [space] is a space explicitly included in the formula; the carriage returns are added by Excel when copying multiple rows. A carriage return is placed at the end of each row. In this instance, I copied only one cell in each row but many rows; so there was a carriage return after each cell.) The command text: 3DFACE [space] -5.255,0.363,3.289 [carriage return] -5.2575,0.3695,2.798 [carriage return] -3.933,0.358,2.8 [carriage return] -3.931,0.3525,3.2895 [space and carriage return] 3DFACE [space] -3.922,0.349,3.2895 [carriage return] . . . . The AutoCAD command 3DFACE is followed by a space (treated as equivalent to a carriage return by AutoCAD), and then each successive set of coordinates is followed by another carriage return. The last set of coordinates in each group has an added space (again, interpreted as a carriage return by AutoCAD) to indicate that there are no more vertices on the surface in question. I added the spaces in the command text and took advantage of the fact that Excel inserts the carriage returns automatically at the end of each row.
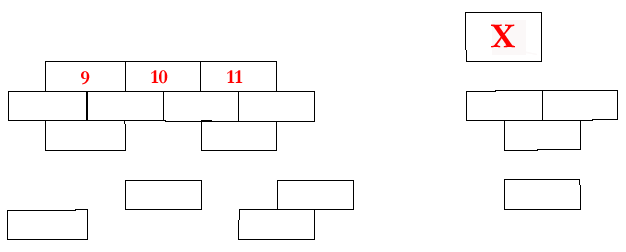
Fig. 3 - The AutoCAD version of the portion of the wall shown in Fig. 1. Only a part of the wall was included in the spreadsheet, and, since I was working with photocopies, a number of the coordinates could not be read; as a result only 18 of the 50 blocks in the area I worked on were modeled. Blocks X, 9, 10 and 11 may be used to orient blocks in figs. 1, 2, and 3 and in the Excel table.
This turned out to be a better system then I had expected. Whether the data are in the form we had or in some other form, the spreadsheet can provide a quick and easy way to go from data to AutoCAD drawing. The aim is simply to obtain text that mimics the AutoCAD command stream and then to paste that text into AutoCAD. One of the best things about this approach was that I could work with AutoCAD and Excel at the same time, trying the commands in AutoCAD and then adjusting the formulae in Excel to duplicate the command syntax exactly. Once I got the syntax down, the formulae could be copied to any number of rows. Entering data into the spreadsheet for 50 blocks, checking the numbers, and then drawing those for which all vertices were specified took about an hour. I would estimate that drawing blocks individually with direct AutoCAD commands would have taken about half again as long if all the dimensions had been together on a single page and each set of dimensions was checked after entry but before completing the command, substantially longer with the dimensions on three pages.
We expect to use this procedure for the CSA Propylaea Project, and I recommend it strongly.
-- Harrison Eiteljorg, II
To send comments or questions to the author, please see our email contacts page.
For other Newsletter articles concerning applications of CAD modeling in archaeology and architectural history; or the use of electronic media in the humanities; consult the Subject index.
Next Article: Web Usage Is High - More Lantern Slides Coming
Table of Contents for the Spring, 2000 issue of the CSA Newsletter (Vol. XII, no. 3)
 Table of Contents for all CSA Newsletter issues on the Web